

When I started my blog, I didn’t know the first thing about blogging. I started it as a hobby to improve my writing skills. However, by the end of the first year my blog was getting over 100,000 page views a month.
Since then it’s become a very fulfilling part of my daily life, where I interact with people, guide them to the answers they seek, and hopefully help them solve a few problems along the way.
If you want to know how to start your own blog, this guide will take you step by step to get your blog up and running. There is a ton of misinformation on the web, so I’ll cover what’s important and let you know what you can ignore.
What to Consider when Building a Blog
While writing is the main focus of any blog,finding readers is going to be a close second. That’s why before you even write a word, you should consider building a blog that will be optimized to obtain readers from the biggest source out there, Google search results.
Many will tell you to diversify your traffic sources for a successful website. While this is true in the long run, I find it best to concentrate your effort specializing in one traffic source. When you multitask you are spreading your focus across various efforts, making each less likely to succeed. Ultimately, it’s best to focus on one area and make sure you get it right. Then, you can move on to another source.
I found a lot of success with building organic traffic from Google. The blog I show you how to build in this article is structured to lay the foundation for getting ranked on Google search results pages.
You will hear a lot of noise out there on how to rank high on Google. I can tell you from experience there are three things that matter more than anything else. They are;
- The site must be fast
- The site must have a clean design and be responsive to mobile
- The content on the website must be of the highest quality
If you can nail those three objectives you will have an awesome blog that gets organic traffic. With that in mind, I’m going to take you through how I put my blog together,
So let me start by telling you, the thing you might think is most important is actually of minor importance.
Picking a Blog Name
The name of your blog isn’t something you should consider a roadblock to starting a blog. It’s not as important as you would think. It’s the quality of the blog that makes the name important.
But you may be thinking “Shouldn’t my blog’s name be relevant to what I’m going to write about?” Well, I’ll just point out that one of the biggest IT companies in the world is called Apple, and the other one is called “Google.”
Don’t let picking a name slow you down. Let’s get to the most important part; picking a host for your blog. Most of which will register the name you eventually choose.
Finding a Host For Your Blog
Most people will say that you should decide what blogging software you should use before choosing a host. I say, use WordPress. 26% of all websites in the world use it. It’s stable, it’s easy to configure, and it’s free.
It also has thousands of themes available out there allowing you to personalize your WordPress Blog without writing a single line of code. I’ll go into detail on that later, for now let’s find a host for your blog.
With all the different companies looking to host your blog, you could spend weeks researching whom to use. If your goal is to have a successful blog with a steady readership, you’re are going to want a platform that is fast and reliable.
You’ll also want most of the technical issues managed for you so you can worry about writing and administering your blog. The host I use and the best value out there that meets these requirements is easily DreamPress 2 from DreamHost.
They provide you your own virtual server with WordPress installed, a separated database server for more muscle, unlimited bandwidth, and a dedicated IP address. They have put a lot of thought in the design of their architecture. With multi-level caching, solid-state drives, and Memcached database DreamPress 2 boasts a tolerance over 2.1 million visits a month. Just take a look at the image below showing the Pingdom speed test of my most trafficked page.
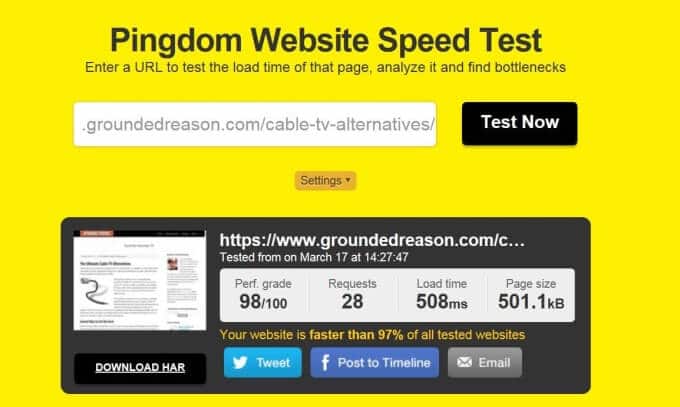
That test was taken with 20 people on my site in the middle of the day. At $20 a month you will not find a better value. Granted, I’ve configured a few things to make that speed possible. And I’ll address those tricks in this article, but that speed wouldn’t be possible without DreamPress 2 as the foundation.
What About Shared Hosting
DreamPress 2 is essentially a managed virtual private server (VPS). However, if $20 a month is too steep to start out, you can always go with shared hosting. Shared hosting environments host your blog along with other blogs on the same IP address.
While very affordable, you might run into some of the following issues on shared hosting.
- If one of the websites on your shared environment is “spammy” or has a low trust ranking you could run into possible guilt by association scenarios. One of the shared hosting environments I was on caused majority of my email to get listed as spam due to a spammer being on my IP address.
- There are more security holes. The more websites on a server, the more entrances there are to the environment. This means, more opportunities for hackers to access and exploit the environment.
- Your search engine rankings could be penalized due to the actions of those on your IP address. I’m not only talking about spam, but poor design on other websites could use up resources resulting in slower loads on your website. Speed is a factor in Googles search engine algorithm.
These are just a few of the issues you might run into using a shared hosting environment. There are others. If you want to test the waters in shared hosting to see if like blogging, you can always try DreamHosts shared hosting environment. This would make for an easy migration to DreamPress later.
If you are simply looking to get started with as little investment as possible, then you may want to look at BlueHost. They offer very low shared hosting rates for the first year.
What about Free Hosting
If you plan to relegate your blog to a personal hobby and don’t care about traffic, then you may be able to go with a free hosting solution. The problem with free hosting is you can’t use your own domain name, which really hurts your search rankings. Furthermore, free hosting companies make money putting ads on your blog. It really isn’t free. They are just making the money you could be making.
If you want to go this route, I recommend looking into a service like blogger.
How to Create a Blog In WordPress
WordPress is a Content Management System you use to create your blog. It powers your blog and is the software you will use to write and published the various posts and pages that will make up your website.
WordPress is available in 2 flavors. The version I use is available from WordPress.org. It’s open source, free, and can be installed on any server or host I want. It provides total freedom over what you want to do with your website.
Then there is the flavor hosted on the WordPress.com website for free. It comes with all the limitations previously mentioned with a free site. While there are paid upgrades to remove those limitations, it can get much more expensive then the open source version from WordPress.org. So when WordPress is mentioned in this article we are talking about the version from WordPress.org.
If you went with the DreamPress 2 hosting plan I used, WordPress will already be deployed on your server from DreamHost. Otherwise you may have to download the software from WordPress.org and follow the hosting providers instructions for installing WordPress.
Within WordPress you deploy what is called a “Theme” that gives your blog or website a certain look or feel. But wait, there is a piece in between the Theme and WordPress I strongly recommend . . . The Framework.
Why A Framework is Important
Without a framework, you are going to do a bit of HTML, CSS and possibly PHP coding to get your blog the way you want it to look. If you were a developer, you would write a framework to make this functionality reusable. Luckily you don’t have to do any of that and can just start writing content for your blog. . . if you install a Framework.
The Genesis Framework
The Genesis Framework from StudioPress powers my blog. You can install Genesis in less than a minute and it will provide access to numerous professional looking themes that make it look like you spent months instead of minutes putting your blog together.
One of the biggest selling points of Genesis for me was how clean the code is. Organically ranking in search engines is the holy grail of blog traffic. Genesis is designed to produce a site that covers all the search engine optimization (SEO) basics Google is looking for when it crawls your site. It takes a lot of work to keep up with all the SEO standards when it comes to designing a site. Genesis handles most of that for you.
The Genesis Framework also has a ton a great features you want in a blog like multiple layouts, custom post types, breadcrumbs, pagination, and tons of other cool features most bloggers want in a blog.
Genesis is also updated regularly, resulting in a secure and stable framework acting as the foundation for your site. Every Genesis user receives updates for free, and get lifetime support for the framework.
Once you install Genesis, you simply install a Genesis child theme and after a few configuration settings to adjust layouts and color, you can start your first post. The child theme you pick is the most important decision you’ll make as it provides the overall look and feel of your blog.
Picking a Child Theme
Of course, the child theme you pick will be based on you own personal tastes and what your overall intent is with your blog. However, there is one important feature you want in the child theme you pick. And that is to make sure theme is mobile responsive.
More than half of the devices on the web are tablets and smartphones. That number is only going to go up over time. You want your blog to look amazing whether it’s on a desktop PC or on someones smartphone browser. Coding that yourself would take many dedicated hours. Luckily, Genesis offers numerous child themes with mobile responsiveness built right in.
Call me old fashioned, but I like a newspaper look and feel to a blog, so I went with “eleven40 pro” as my child theme. It’s perfectly coded in HTML5. It’s mobile responsive and it covers many of the SEO basics, helping me show up on those ever important search engine results pages
Getting Genesis Set Up
Purchasing Genesis and a Child Theme will cost around $100. That’s a steal considering you would pay a developer thousands to develop a website that looks this good. Plus, once you purchase Genesis you can install it on as many websites as you want.
Choosing a theme can be a bit daunting. Personally, I think minimal is better. You want your content to be the focal point of the website. With that in mind, I recommend something like “Wintersong” or “Focus Pro“. Both direct eyes squarely on your content.
However those are my tastes. You may be looking for a more “web magazine” feel, where something like “Metro Pro” or “Glam” may be more your speed. Whatever you pick, you will be getting a website that is ready to start publishing almost immediately.
Installing Genesis
Installing Genesis and a child theme is a piece of cake. Simply follow the steps below to install the Genesis Framework first, then go through the same steps again to install the child theme.
- Download Genesis.zip and your child themes zip file from studio press
- Log in to your WordPress, go to the dashboard and go to Appearance > Add New Themes.
- Just below the headline, click the link that says “Upload”.
- Click the browse button and find the genesis.zip file from your local machine (or if using a child theme find the child theme’s zip file) and then click the “Install Now” button.
- repeat steps 2-4, using your child themes zip file instead of genesis.zip
That’s it, your ready to start your blog.
A Quality Responsive Blog That’s Fast
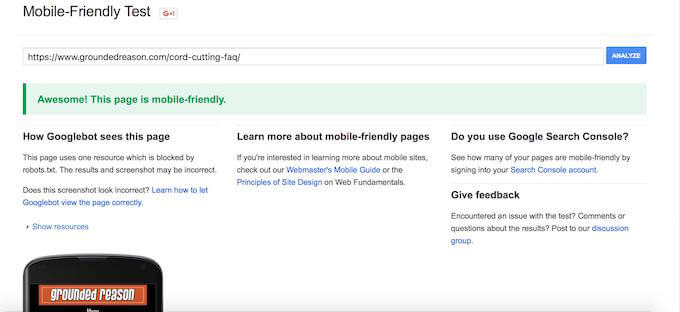
So if you have followed my advice thus far, you are running on DreamHost’s DreamPress 2 platform and have the Genesis Framework powering your blog. You’ve likely picked a mobile responsive theme which should take care of one of the three important factors I originally stated.
You can test your mobile responsiveness with Googles online Mobile Friendly Test. If you are using a responsive theme, you should get a result like the one pictured below.
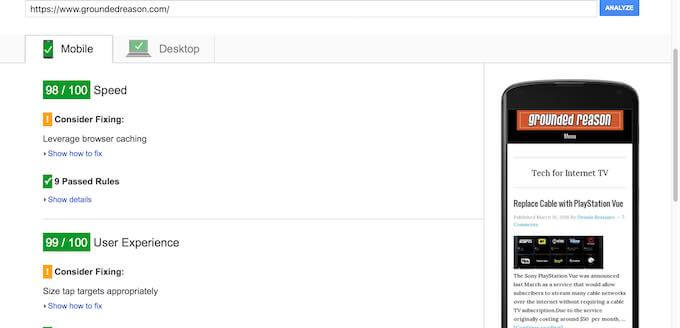
The next thing you want to look at is speed. Now Pingdoms full page test will give you a good indication of the speed of any page on your website, but if you want actionable results I would use Google Page Speed Insights.
Google Page Speed Insights will tell you what is slowing down your website, how to fix it, and provide an overall score. A reasonable goal is a score 90. Considering it’s Googles search engine you want to rank for, it only makes sense t use their speed test tool to optimize your website. Here is what my Page Speed Insight Test Looks like.
While I would love to tell you how to fix each and every issue Google Page Speed Insights may point out, that would make an already long article even longer.
So instead I’ll list some WordPress plugins below that will assist you in correcting some of the issues. If you need help installing the plugin, just check out this guide.
Useful WordPress Plugins
Autoptimize – This plugin combines and optimizes all your CSS and Javascript. It also minimizes your HTML.
TinyPNG – compresses JPG and PNG image files on upload.
WP Super Cache – WordPress pages are dynamic and generated by PHP which is slower than an HTML file. This plugin provides a means for WordPress to cache your website files as static HTML, serving them up at lightning speeds.
Yoast SEO – While the Genesis Framework provides a base level of search engine optimization, Yoast SEO takes it to the next level. The plugin also provides a means to easily access your htaccess files which comes in handy for a few Page Speed issues. I use this handy guide to address cache header expire and gzip compression issues.
Key Security Plugins
Akismet – A must have for auto-management of blog comment spam.
Login Lockdown – Lockdown the login screen for your website’s WordPress admin screen after so many failed attempts. This keeps brute force hackers from accessing your website.
So now we have a blog that is fast and responsive. So what about that ever important bit about writing quality content.
Writing Quality Content
You might be reading this thinking to yourself, “Quality? well that’s subjective.” While you are correct, there is a level of writing that most will agree is better than 90% of what you will find out on the web. That is the level you should strive for.
So if you want to get started on ranking an article in Google here are some basic steps.
- Take the subject you want to write about and use “Google Adwords Keyword Planner” to get an idea of what keywords pull in a lot of organic searches. Here is a guide on using Adwords for some basic keyword research. Try to pick terms that are 3 words or longer these are called “long tail keywords”.
- Google the phrases you are targeting and check out the number 1 results for each search.
- Write something better.
Okay I was being a little funny there with number 3, but it’s the truth. Look at the articles that are currently ranking and write something, more current, more in depth, and more researched than anything else you find. That will be the centerpiece of your new blog.
Once you have finished that piece, write other posts around that topic that refer back to your centerpiece. When you link the centerpiece article, be sure to link back to it using the keyword phrases you found or phases that are semantic matches for the phrase.
Semantic Matches?
Yep I just dropped a 50 cent word on you with no explanation whatsoever. Sorry about that. Semantic matches are best explained through an example. I’m looking for a phrase the means the same as my keyword phrase using different words.
For instance, let’s say my centerpiece article is “The Ultimate Guide to Buying the Best Bedspread” and I’m trying to rank for “how to buy a bedspread.” Not only would I link back to the centerpiece with “how to buy the best bedspread”, but I would want to use links with different anchor text that means the same as my keyword phrase.
I would use terms like “purchasing a good comforter for your bed”, “shopping for a quality duvet”, or “getting the best deal on comforters.” Each phrase gives google a little bit more insight into what the centerpiece article is about. This helps Googles algorithm rank you in their search results.
Titles and Description
Quality content just doesn’t mean the content of the article you’ve written, but also the information that explains what your article is about. In a search results page, the user decides what to click on based on the title and description you’ve provided them. You want them to click it, so you have to draw them in.
What are you more likely to click on, an article titled “How to Buy a Bedspread”, or “Everything You Need To Know when Buying a Duvet”? I bet most people picked the second one. Well, that matters heavily in search. The links that get clicked more, climb higher and higher on the results page. So make sure you have a great title and description, so all your hard work isn’t wasted.
Some Final Thoughts
So I want to leave you with some tips to follow that I’ve picked up along the way. While speed, responsiveness, and quality content are key to any good blog, there are many other factors that will help you build a successful blog.
- Try to post one good article a week. One solid post that’s interesting or informative is more engaging than 3 or 4 quick posts with little substance.
- Always answer comments and email. People write because they want interaction and advice. Help them out. They will appreciate it and maybe even share the blog with their friends.
- Don’t worry about monetizing your blog. Be more concerned about what your readers need. If you respect your readers and their needs, your traffic will increase. If you have loyal readers, traffic will build and you will find ways of monetizing your blog that are beneficial to your reader.
- Don’t spam your blog in every forum and comment section. It’s okay to link your blog, but only when it’s relevant. Linking your blog should never be engineered. The best PR you can do is to interact with relevant communities and build a reputation for being knowledgeable about your topic. Do that and link opportunities will arise.
- Keep plugging away at content and try to do some basic keyword research on your topic. It may take a few months before your organic results come in. But if you stay diligent it will happen.
- You will find a ton of articles out there saying things like “links to your site are important for ranking” because #1 results on average have many external sites linking to them. While this is true, it’s likely those sites have lot’s of links because when someone is looking for a source they go to sites that rank high on Google search results. Many of my pages ranked with little or no linking from external sites.