This weekend, my Roku TV met its demise during an escalated pillow fight. While the TCL makes an excellent Roku TV, it will lose to a kid and a high-speed bag of feathers every time (especially if they think they’re Thor and spin up fluffy Mjölner before throwing.)
While this is an expensive error, I did have a Roku 4 and an older flatscreen TV I could use until we dock enough allowance to get a new Roku TV. To make matters worse, we couldn’t find the Roku remote, so I had to get creative when setting up the Roku 4 without the correct remote.
Before I explain how to set up a Roku without a remote, let’s look at the difference in Roku remotes and which Roku devices they support.
The Differences Between Roku Remotes
If you ever lost or broken your Roku Remote, you may have tried a replacement that didn’t work. The Roku remote may have been perfectly fine. It just wasn’t the right Roku remote for your particular Roku. There are two types of remote technologies Roku uses, the Roku IR Remote and the Roku Enhanced Voice Remote.
Roku IR Remote: The Roku IR (infrared) remote uses a beam of infrared light to control your Roku device or Roku TV. As most TV remotes work, the Roku IR Remote requires a direct line of sight to the Roku device you want to control. Furthermore, you can use the Roku IR remote on multiple Roku devices that support the IR remote simultaneously. For example, you can take the Roku IR remote you use on your bedroom Roku TV and seamlessly use it on the Roku TV in the living room.
Replacement Roku IR Remotes are available on Amazon for under $10.
Roku Voice/Enhanced Voice Remote: The Roku Voice Remote and Enhanced Voice Remote, also called the “point anywhere” remotes, use radio frequencies or “RF” to control the Roku device through your wireless network. These remotes need to be paired with a specific Roku device, and not more than one Roku device. I’ll explain the subtle differences between the Voice and Enhanced voice remote in this section below. For purposes of this article, I’m referring to this type of remote if I say “RF Remote” or “Enhanced remote.”
The Roku RF Voice Remote is available on Amazon for under $20.
The Enhanced Voice Remote is available on Roku’s Website.
How To Tell the Difference Between Roku Remotes
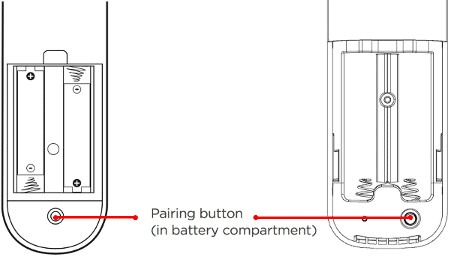
To tell the Roku IR remote from the Roku Enhanced/Voice Remote, open the battery compartment. The Enhanced remote will have a pairing button used to pair the Roku Enhanced Remote with the Roku device. The Roku IR remote will not have this button.
There is also a trick you can do with your smartphone camera to see if your remote is infrared. Put the camera on selfie mode and click a button. You will see a little light blink on your screen that you can’t see if you look at the remote.
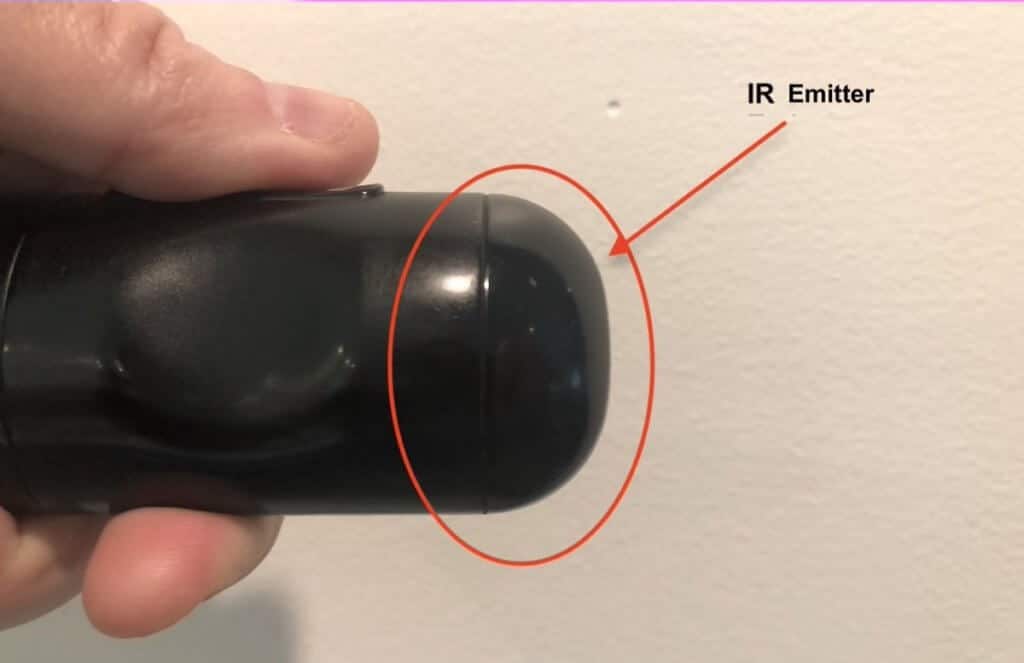
You can also look to see if there is a black tinted plastic window at the front of your remote. If so, it’s where the infrared light emits from the Infrared You can also see if there is a black tinted plastic window at the front of your remote. If so, it’s where the infrared light emits from the Infrared remote. The Roku Enhanced Remote does not emit light and doesn’t require an emitter. Considering the Roku remote is black, this may be difficult to see.
Which Roku Remote Works on Each Roku Device
The “Roku Simple Remote” is Roku’s IR remote. Every Roku device, except Roku Streaming Sticks and the Roku Soundbar, can use the IR remote. Non-stick Roku devices that are compatible with the RF remote have an IR receiver. Roku Streaming Sticks do not as they plug directly into an HDMI port, which will make the line of sight required to use an IR remote impractical.
The Roku Voice remote is an RF remote that pairs with your Roku device over your home network. It has a microphone that enables voice search and control functions on your Roku device. Here is a list of all the Roku models that support using the Roku Voice Remote:
- Roku 3
- Roku 4
- Roku Express+ (model 3931)
- Roku Premiere
- Roku Premiere+
- Roku Streaming Stick (model 3600, 3800)
- Roku Streaming Stick+ (model 3810)
- Roku Ultra LT
- Roku Ultra
- Roku Smart Soundbar
The Roku Enhanced Voice remote has a headphone jack and enables private listening mode, which mutes the TV when headphones are plugged into the headphone jack. This feature lets you watch Roku without disturbing others in the room. The following devices support the Roku Enhanced Voice Remote:
- Roku 4
- Roku Ultra LT
- Roku Ultra (model 4670)
- Roku Smart Soundbar
- Roku TV (model series 6000X, 7000X, C000X, 8000X, A000X)
These lists are the official support lists from Roku’s website. However, the models listed above will generally work with either RF remote. You just won’t be able to take advantage of private listening with the Enhanced Remote if the device doesn’t offer that feature. You can’t take advantage of private listening on a Roku ultra if you have the Roku Voice Remote without a headphone jack.
There is also an RF “Gaming Remote” that enables voice search and private listening. Two gaming buttons distinguish this Roku Remote from the other RF remotes. At one time, Roku was experimenting with tapping into gaming. That remote is only officially supported on Roku 2 (Only model 4210) and Roku 3.
Pairing Your Roku Remote
If your Roku device is compatible with a Roku RF Remote (The Roku Voice or Enhanced Voice Remote), place the remote next to the device when you turn it on. It should automatically pair. If not, follow these steps to pair a Roku RF Remote:
- Unplug the power adapter on your Roku and plug it back in.
- Open the Roku remote battery
- Place the Roku remote in close proximity with your Roku player.
- Press and hold the pairing button inside the battery compartment for 3 seconds.
- Wait about 10 seconds for the remote LED to stop flashing.
- Try using the Roku remote again.
The IR remotes don’t require pairing to a Roku device. They will simply work when you point them at the Roku. If your IR remote isn’t working, make sure there isn’t any obstruction between the remote and the Roku.
A useful troubleshooting step for either remote is replacing the batteries.
The Roku App
While not a conventional remote, the Roku App enables all the available features on a Roku device. The Roku app downloads to iOS and Android devices and can connect and control any Roku Device on your network. This support guide on Roku’s Website has information on using the Roku App.
Setting Up Your Roku Without a Remote
Now that we are all wise in the ways of Roku remotes, what do you do if you lost or don’t have a working Roku remote?
Unfortunately, if your Roku device doesn’t have an Ethernet port, there isn’t a way to connect your Roku to wifi without a Roku remote. You can usually get a Roku remote fairly quickly from Amazon. However, if your Roku device has an Ethernet port, we can set it up using the Roku app.
The Roku app only works with Roku devices on your network. We can get your Roku device on the network via Ethernet, then use the Roku App to have it join your wifi network. Here are the Roku devices that support Ethernet:
- Roku 2 (4210, 3100, 2100)
- Roku 3
- Roku 4
- Roku Ultra
- Roku Ultra LT
- Most Roku TVs
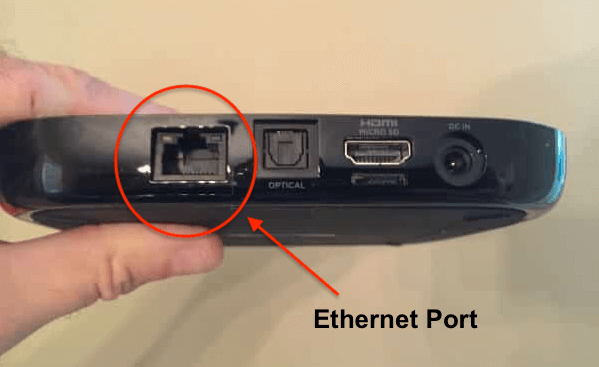
For those unfamiliar with what I’m talking about, the picture below shows the Ethernet port on the back of my Roku 4.
To do this, we will need to know where your router is, and an ethernet cable. You may not think you have an ethernet cable, but many devices come with one. Most game consoles, routers, and other devices ship with an ethernet cable. Most people have at least one in their house somewhere. Also, you will need to connect your Roku to a TV as you normally would and to your router with an Ethernet cable. You will need those devices to be close to one another, or you will need a long Ethernet cable.
Here are the steps to setting up your Roku device without a remote:
- Connect your Roku to the TV per the Roku setup instructions, but leave the Roku unplugged
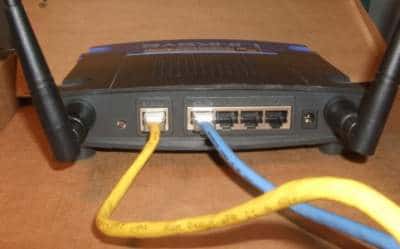
- Plug one end of the Ethernet cable into your Roku’s Ethernet port. Plug the other end of the Ethernet cable into the LAN port on your router. While every router is different, it should look something like the picture below these steps
- Once everything is connected, power on your Roku device. Once it’s fully up, it should automatically join your network.* The ethernet port on the Roku device should light up.
- Install the Roku App on your phone and open it. The app should prompt you to connect to your Roku. Select your Roku device.
- You should then be able to use the “Control” page as a remote control to navigate to “Settings” -> “Network” -> “Setup Connection” – > Wireless Network
- Enter your wireless network information. Once you hit ok to join the network and it is successful, you will need to re-connect to your Roku device with the remote app.
*For this to work, your home network has to be set up for devices to join via DHCP. DHCP is generally the default in-home network setup. If your network isn’t set up for DHCP, you will have to get the proper Roku remote. I touch upon the topic of DHCP in my guide to improving your wifi by utilizing Ethernet.
You can now use the Roku App through your phone to use your Roku device.