 Sharing data across your home network is usually a chore for many. Setting up movies, music, and photos to be streamed from a central network location can be impossible without the right technical chops.
Even if you possess the technical skills, it can easily consume days of your life. Then, once everything is set up you will find yourself constantly tinkering with the network any time you want to get data or media to a new device.
Thankfully, Western Digital has made this task extremely simple by offering an affordable Network Attached Storage solution that includes a media server called WD My Cloud.
An Amazing Home NAS
Network Attached Storage, or NAS, is essentially a file server that hooks directly to your network. Its hardware can be geared for specific tasks like backups, file sharing, or even serving digital media. In the past, home users would have to design and build their own NAS solution, or spend into the thousands for a vendor supplied NAS.
WD My Cloud provides the everyday user with a NAS solution that allows sharing files, serving media, and backing up your data. Furthermore, it allows storage of photos, movies, or any other file from your smartphone or tablet. This provides a location to free up space on all your mobile devices. Moreover, you can receive this functionality from the My Cloud for less than $150.
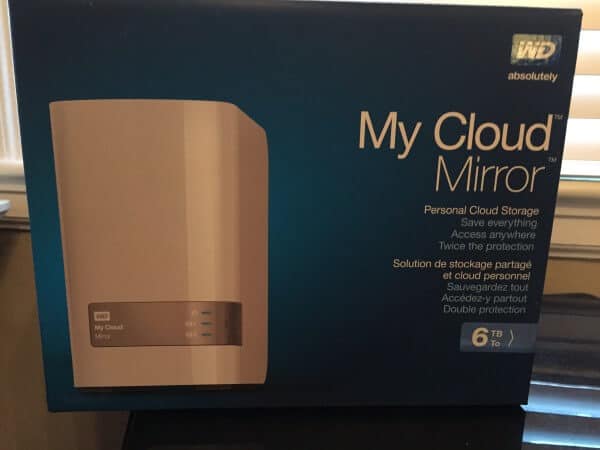
The WD My Cloud comes in various storage configurations. They offer 2TB, 3TB, 4TB, and 6TB models. In addition, each of these models has a WD My Cloud Mirror version that doubles the storage so it can Mirror itself creating an instant backup in case of drive failure.
I recently purchased a 6TB WD My Cloud Mirror from Amazon and I have really enjoyed it. It’s simplified backing up all our movies, music, and photos. Furthermore, it’s easy to turn this device into a media server that can stream to any device on your network.
Setting Up WD My Cloud
Setting up My Cloud is extremely simple. You simply power the NAS from your wall outlet and connect the NAS to your home router with an Ethernet cable. Once My Cloud is powered and connected to the network, you simply download an install package on each device you want to use and follow the easy setup guide.
You can find the install package at WD My Cloud Learning Center. Simply select “My Cloud” or “My Cloud Mirror” depending on the device you purchased and install the software. If you need help with this there are some great video tutorials on the WD Support Site.
My Cloud is ready to go right out of the box. However, there are a few changes to the default settings I recommend making.
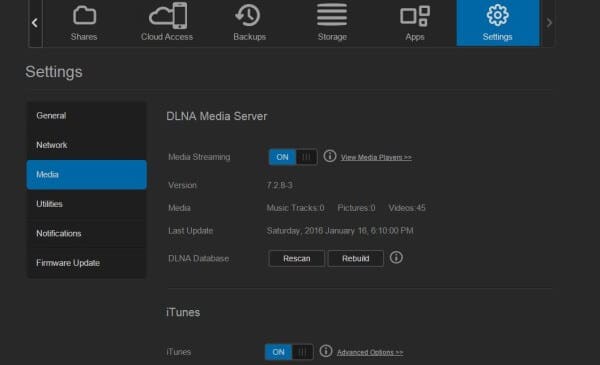
DLNA Server
WD My Cloud is the perfect solution for streaming media to all devices in your house. My Cloud comes with TwonkyMedia DLNA media server already installed. This will allow streaming of music, movies, and TV shows to any DLNA or iTunes compatible device.
To turn on the WD My Cloud DLNA server go to “Settings” then “Media in the configuration and turn on “Media Streaming.” This will allow you to store movies, TV shows, photos, and music on your WD My Cloud and view them on any device on your network.
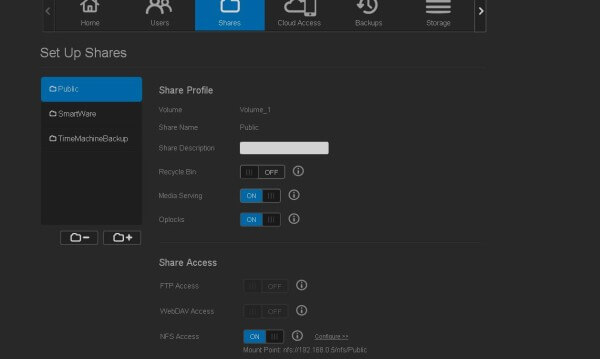
Once the DLNA server is turned on, you have to enable the shares to serve media. As shown below, navigate to “Shares” and make sure the “Public Folder” has “Media Serving” turned on.
Network File System
To easily copy movies, music, TV shows, and photos to your My Cloud I enabled the network file system. To do this go to Settings -> Network and then Network Services. There you will be able to turn on the NFS service.
Then go back to “Shares” and turn on “NFS” to the Public share under “Share Access”. This will allow you to copy movies, music, and photos to the Public share to be accessed by other devices. This is also done under the “Share Access” menu.
Static IP Address
First I recommend a static IP address. Notice the WD My Cloud setup software opens up your browser and takes you to an IP address on your network to configure the device. The default uses DHCP, which means the address can change. I recommend using a static IP so it never changes and you always know how to access the device.

Setting a static address is simple in the WD My Cloud configuration menu. As pictured above, go to Settings -> Network and select “Static” under “Network Services”. You will then be asked to input an IP address. But what address to input?
Your home network usually has a set of 254 available addresses. The router typically has an address like 192.168.1.1, and hands out addresses to devices on your network between 192.168.1.2 and 192.168.1.254. The first three numbers can be different from network to network, although it’s typical for most to be using 192.168.x.x. While there are numerous ways to configure a home network, the ones I’ve seen are set up the way I just described.
Those addresses are typically handed out in order, starting with 192.168.1.2, so giving your WD My Cloud an address like 192.168.1.250 usually won’t cause a conflict. However, this is not the recommended way to do this. The proper way involves limiting the range of IP addresses your router assigns and keeping a pool of addresses for static IPs.
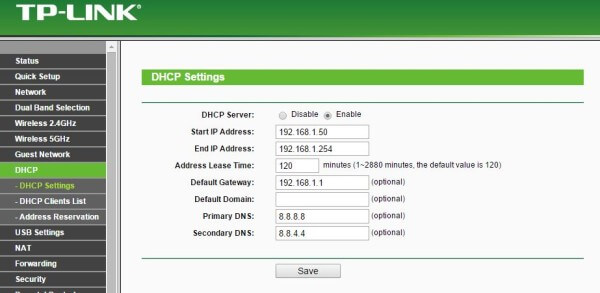
To do this you need to log into your router and change the DHCP settings to limit the addresses available for assignment. Instructions for doing this are usually in the router’s owners manual. If you are supplied one by your ISP, check their support site for information on how to do this.
Below is a screenshot of the DHCP configuration on a TP-Link Archer C8, which I consider one of the best routers for the money on the market today.
Other Settings
Aside from turning on the DLNA server and setting a static IP address I also recommend doing the following:
- Change the name of “admin” user and assign a password. This is done in the “Users” configuration screen.
- Turn off “Drive Sleep” under the “General” Tab
What I Do with WD My Cloud
Home Media Server
Once I had the WD My Cloud installed and configured, it showed up under my “Network” folder as a computer. I was then able to upload movies to the WD My Cloud and watch them on my Roku Media Player Channel.
Using my Roku, this took no additional setup, I simply started the Roku Media Player Channel, and chose the WD My Cloud media server.
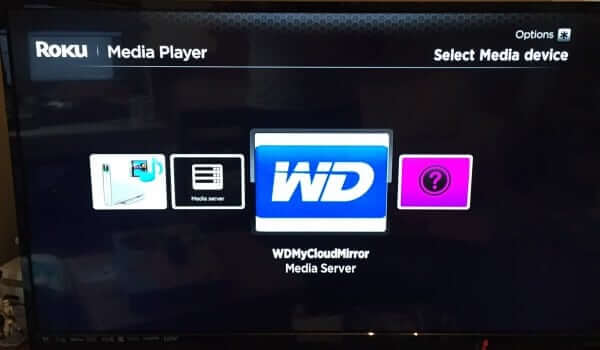
From there I could access all my uploaded movies.
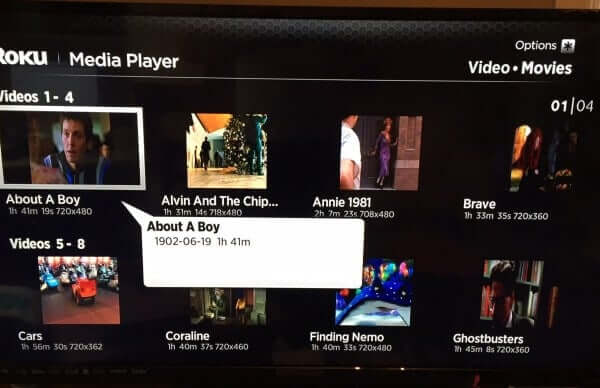
You can do the same with music and photos. WD My Cloud even supports your iTunes Library. I can access all my media from any device in my house. This includes my iPhone, iPad, Windows PC. I can even watch these movies on my kids Kindle Fire HD with the VidOn Player HD App.
Backup All Your Files
Everyone should have a means of backing up their critical data on their home PC or tablet. Typically, home users will buy an external hard drive and schedule periodic backups for each device. That can get very expensive at $50-$150 a drive.
Since WD My Cloud is connected to your network, all computers on the network can backup to My Cloud. If you backup phones and tablets to a PC or laptop, then all your data will be protected from system crashes and user mishaps. Furthermore, WD My Cloud supports backing up both Windows PCs and Macs.
WD My Cloud makes backing up your system easy with WD SmartWare. To back up your device, install the WD SmartWave App and follow the easy backup setup instructions. This software usually costs $20, but having a WD My Cloud includes it with no additional cost.
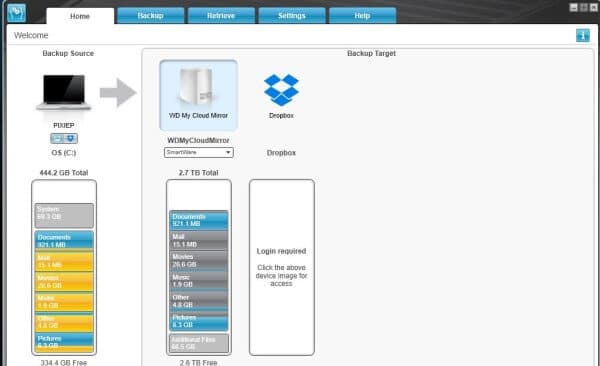
Alternatively with the NFS file system turned on, you can simply Map a drive and use your systems native backup methodology.
I’m only mentioning a few of the things I’ve done. WD My Cloud adds limitless flexibility for a home media solution. Consequently, this opens up endless possibilities for creative media solutions.
Device Compatibility
- Windows 8.1 or earlier, Windows 7 or Windows Vista operating systems
- Mac OS X Mavericks, Mountain Lion, Lion or Snow Leopard operating systems
- DLNA/UPnP devices for streaming
- Compatible with Apple Time Machine
- Internet connection for remote access
- Browser Support: Internet Explorer 8.0 or higher, Safari 6 or higher, Firefox 21 or higher, Google Chrome 27 and later
Device Specifications
- Box includes Personal cloud storage, Ethernet cable, AC adapter, Quick Install Guide
- Available in 2TB, 3TB, 4TB, or 6TB configurations
- Supports adding an external hard drive to the NAS for added storage via USB 3.0 expansion port
- Supports Gigabit Ethernet
- WD’s My Cloud app to access and share from mobile devices
- WD SmartWare Pro for auto and cloud backup
WD My Cloud Mirror
As I mentioned, I purchased the WD My Cloud Mirror. This device is for those that want more protection from data loss. This NAS offers all the functionality of My Cloud with double the storage to allow for RAID 1 mirroring. Ultimately, this provides a direct copy of data on the NAS in case of a drive failure. Having a backup of your backup ensures your data is protected from NAS failures and destruction of photos, videos, and other precious data.
Whether you want the peace of mind of convenient backups for all your data, or you are building a top-notch media solution, the Western Digital My Cloud offers one of the best values on the market today. If you are interested in purchasing a My Cloud or My Cloud Mirror you can click on either affiliate link below.